


Converting Patterns
Identifying the problem is half the battle
If you want to knit a design but are having trouble following the instructions, you can easily recalculate the pattern to suit your needs. First, identify exactly where the problem lies. The most important step before starting any new knitting project is to knit a gauge swatch. If you want to knit a pullover using the original yarn in one of the specified sizes, compare your gauge swatch with the gauge given in the pattern instructions. If they do not match, knit ANOTHER GAUGE SWATCH and adjust your needle size until you achieve the correct gauge. If you want to change the size, the fit or the yarn, you'll first need to do some preliminary calculations to ensure that the finished garment turns out exactly as intended.
The right size
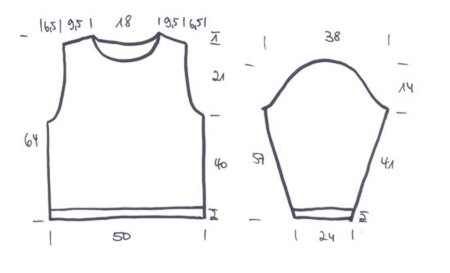
It's always a good idea to compare the measurements shown in the schematic of the chosen design with those of your favorite pullover from your wardrobe. If you would prefer your garment to be longer, shorter, wider or narrower, draw a new schematic using your own measurements, preferably on a 1:1 scale. While knitting, place your work on the schematic from time to time to check that everything is progressing correctly and make any necessary adjustments. Once you've finished knitting, the schematic will also serve as the perfect template for blocking the pieces before sewing them together.
Rule of three
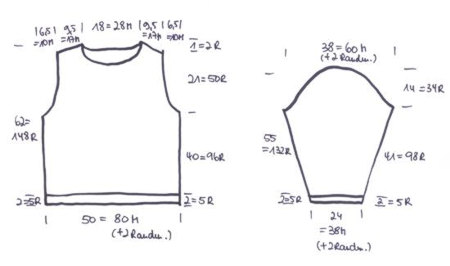
Now all you have to do is convert the measurements into stitches and rows. To do this, you'll need the rule of three. Your gauge swatch tells you how many stitches and rows are required for 10 cm. Example gauge swatch: 16 stitches and 24 rows = 10 × 10 cm
Example:
You'll need 16 stitches for 10 cm, which equals 1.6 stitches per centimetre. For a width of 50 cm (front and back), you'll therefore need 80 stitches, plus the selvedge stitches. For the length, you'll need 24 rows for 10 cm, which equals 2.4 rows per centimetre. For a length of 40 cm (measured from the hem to the armhole on both the front and back), you'll therefore need 96 rows.
The conversion formula is: (measurement in cm * gauge) / 10. For example: 50 * 16 / 10 = 80 stitches or 40 * 24 / 10 = 96 rows.
Now determine the key measurements for your garment by converting all width measurements into stitches and all length measurements into rows. If your calculations don't result in whole numbers, simply round them up or down as appropriate. In most cases, the difference will hardly be noticeable in the finished garment.
Sleeve shaping, sleeve cap, armholes and necklines
In our example, the sleeve measures 24 cm (38 stitches plus 2 selvedge stitches) before the increases begin and 38 cm (60 stitches plus 2 selvedge stitches) after all increases have been worked. This means that 22 stitches need to be added altogether, or 11 stitches on each side.
These increases are worked over 41 cm (98 rows) in height. Divide the number of rows by the number of stitches to be increased. This tells you how often the increases should be worked. In this example, you'll increase 1 stitch at each edge every 8th row, for a total of 11 increases.
The last few rows before shaping the sleeve cap — or before casting off for sleeves without a sleeve cap — are worked without any further increases.
If your calculation results in an uneven number, for example 7, alternate the increases between every 6th and 8th row.
To shape the sleeve cap, armholes and neckline, place your knitted piece directly on the schematic and work the decreases following its outline. It's also helpful to refer to the original pattern as a guide, as the differences are usually quite small.
Repeat patterns, colorwork motifs and pattern placement
If you're knitting patterns with repeats (ribbing, cables, lace patterns, etc.), be sure to take the repeat into account when calculating the number of stitches and rows. Sometimes the only solution is to find a compromise between the measurements and the pattern. In that case, either the measurements or the pattern will need to be adjusted. Here, too, it's helpful to refer to the original pattern. Comparing the different sizes in the original instructions can often provide useful guidance. It's best to position colorwork motifs or pattern sections on your paper schematic first and calculate their exact placement using the rule of three. Alternatively, place your knitted piece directly on the schematic and use the drawing as a guide.
One more tip
It can't be stressed enough how important it is to knit a gauge swatch before starting a new project. Every calculation that follows — and ultimately the success of your finished garment — depends on it. But remember, knitting should be fun, so don't turn it into a PhD thesis! A little improvisation is always allowed 😉